
In this third installment, I’d like to drill down further into the “Digital Rolls of Film” process that I rely on, show you a few images and explain the filters and settings I used to create each image entirely in the camera – with less than one minute each of post-processing time!
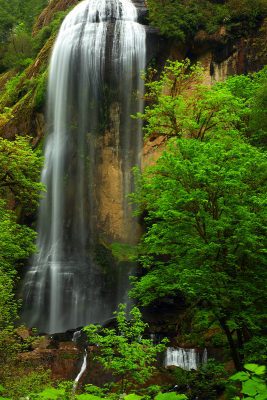
Silver Falls in Golden and Silver Falls State Natural Area in Oregon. F/22 @ 1 sec. -1 stop Exposure Compensation, ISO 50, 67mm with Singh-Ray LB Circular Warming Polarizer.
For Canon DSLR shooters, these digital presets or “digital rolls of film” are found in the “Picture Style” menu. With Nikon DSLRs, they’re in the “Set Picture Control” menu – and with Sony and Panasonic, they may have different names, like “Creative Styles.” No matter what camera brand or model, all DLSRs and most mirrorless cameras have these color controls or “Digital Rolls of Film.” With these color controls (it’s a good idea to let your camera manual take you through them), you can quickly and easily set your camera to one of the presets and adjust/modify that preset exactly to your liking. For this series of posts, I use Canon as an example.
Here’s how to select and adjust the Landscape setting in a Canon DSLR. Go to the Picture Style menu and you’ll see the Landscape, Standard, Monochrome, Faithful, Portrait and Neutral presets – and, in some models, also 1, 2 and 3 presets, which you can assign any preset to, if you wish. Select/highlight the “L” for Landscape and, with most Canons, push “Info” or “Display” to open the Landscape preset adjustments. You should now see Sharpening, Contrast, Saturation and Color Tone. For most Nikons, once you’ve gone to Landscape, you toggle to the right and this opens up similar preset adjustments.
Once you are in the “Landscape” preset adjustments, here are the settings I recommend starting with:
– Sharpness +1 (from the default)
– Contrast +2
– Saturation +3
– Color Tone 0 (no change from default)
Then set up the “Standard” preset with the same settings.
Even though Landscape and Standard have the same settings, they have a different color palette and come out of the camera differently, just like different types of film. The presets in Nikons are Landscape, Standard and Vivid. Sony and Panasonic have similar names but may vary by model.
We’d also set up the “Monochrome” preset (for fantastic in-camera B&W) with these settings:
– Sharpness +1
– Contrast +2
There is no Saturation adjustment in the Monochrome preset, but I’d recommend turning on the Red filter setting, as you might have used a red filter with B&W film. For Color Tone, you can select None (for regular B&W) or Sepia. I like both, but always start with None for standard B&W.
Before you set up other presets, such as Neutral or Faithful, I’d suggest you shoot first with the two or three you’ve just set up, compare the images and adjust as needed. I normally demonstrate all of this during my location workshops, but hopefully you can make sense of it here and give each preset a try for yourself.
I would suggest using fairly stable subject matter, with stable light (maybe an overcast sky). Your goal is to compare the output and learn the color palette of your camera. Then adjust each preset (or “digital roll of film”), as needed, to your liking. Then test each with three different Light Balance settings: 5000K (Sunny), 6000K (Cloudy) and 7000K (Shade). This will help you determine the preset(s) you prefer in which situations/light and how to control it with your white balance. With practice, you can become an expert at controlling the color and temperature of your images right in the camera.
If you shoot in RAW, to see your in-camera work as you see it on your LCD screen, you’ll need to open the images in the software that came with your camera (like Canon DPP). Then do a simple “File: Convert and save as” and save it as the file type of your choosing (I prefer Tiff). Once you’ve done this, you can pull the converted image into any post-processing software you normally use. If you shoot Jpeg (or Tiff, as some Nikons can), you do not need to do this step, as it is an already-processed file.
I personally use two Standard presets and three Landscape presets, the only difference between them being variations in the amounts of Contrast and Saturation. This way, I can easily switch between them for a variety of scenes and lighting conditions.
For sunrise and sunset, I almost always use my Landscape preset that’s +1 Sharpness, +2 Contrast and + 3 Saturation. For Fall color, I tend to use my Standard preset with exactly the same settings. That because, my Landscape presets tend to turn bright reds a little more pink, while my Standard preset renders bright reds exactly the way I want them. These are the types of differences you’ll want to see for yourself.
When shooting red or yellow macro flower shots, I use my Landscape or Standard preset that’s at +1 Sharpness, +2 Contrast and +1 Saturation. These bright colors, so close to the camera in macro photography, tend to overwhelm the camera and become too intense, so I’ve toned down the Saturation to handle that.
Take a look at the images below from Face Rock Beach in Bandon on the Southern Oregon Coast.

1. Landscape preset, white balance 6000K. F/20 @ .3 sec, -1 stop exposure compensation. ISO 100, 50mm. 3-stop Singh-Ray Galen Rowell Graduated Neutral Density Filter.
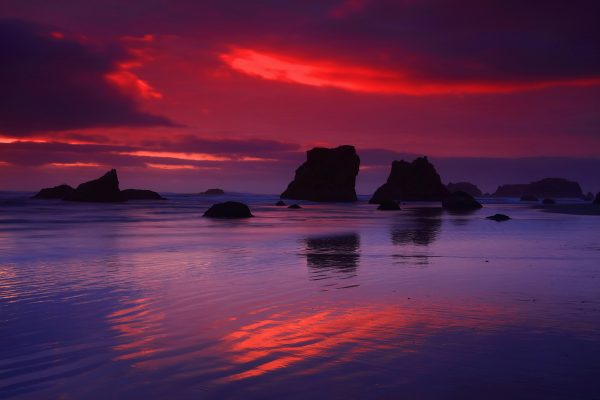
2. Landscape preset, white balance 5600K. F/20 @ 2 sec, -1 stop exposure compensation. ISO 100, 40mm. 2-stop Singh-Ray Galen Rowell Hard-Edge Graduated Neutral Density Filter.
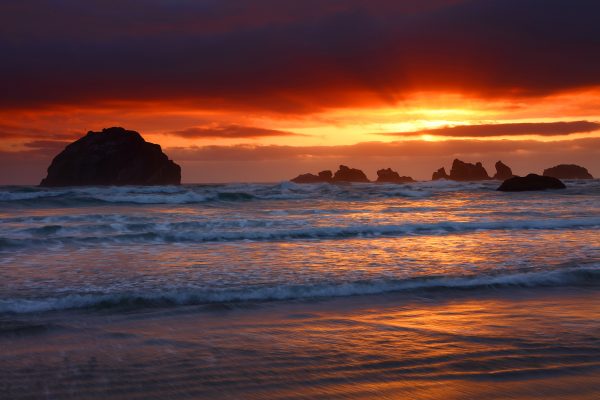
3. Standard preset, white balance 6000K. F/20 @ .3 sec, -1 stop exposure compensation. ISO 100, 50mm. 3-stop Singh-Ray Galen Rowell Hard-Edge Graduated Neutral Density Filter.

4. Standard preset, white balance 5600K. F/20 @ 2 sec, -1 stop exposure compensation. ISO 100, 40mm. 2-stop Singh-Ray Galen Rowell Hard-Edge Graduated Neutral Density Filter,
The first two are shot with my Landscape preset and the next two are shot with my Standard preset. In my opinion, the first two are slightly more red/pink, while the next two are a little more yellow/orange. My preference would be #s 1 and 4 – one in Landscape, the other in Standard. Between #1 and #3, I felt I lost a little pop in #3 (Standard), while between #2 and #4, I think #2 (Landscape) overdid the red tones, but #4 (Standard Roll) kept it right to what I was seeing in the field.
In the end, it is obviously your personal preference and your artistic vision for the image you are capturing – and your choice when you are adjust your camera presets. Note that Galen Rowell Graduated Split Neutral Density Filters were used in all four images to balance light between the sky and the ground.
To capture the image entirely in camera, you not only need to set up your color palette and temperature, but you also need to use the right light-balancing filters. I recommend the Singh-Ray LB Warming Polarizer for use during the day and their Galen Rowell, and Daryl Benson Reverse Graduated Neutral Density Filters to balance the light, especially for sunrise and sunsets. In the lead image of Silver Falls at the start of this post, I used the LB Warming Polarizer to remove distracting reflections from the water and the leaves, which was essential to making the image work.
Here are two images of a sunrise in the Alluvial Fans from Zabriskie Point in Death Valley National Park. The first with no filter, the second with the Singh-Ray grad. The difference is very apparent and really demonstrates why you need to balance light. If I’m using my polarizer during the day, I just hand hold my grad over the polarizer if I need to balance light. During sunrise and sunset, I take off the polarizer and use a filter holder for the grad(s).
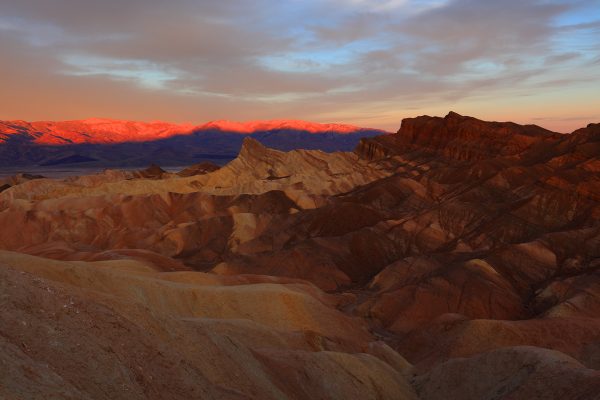
No filter. F/20 @ 1/4 sec, -2/3 stop exposure compensation. ISO 100, 30mm. Landscape preset, white balance 5800K.
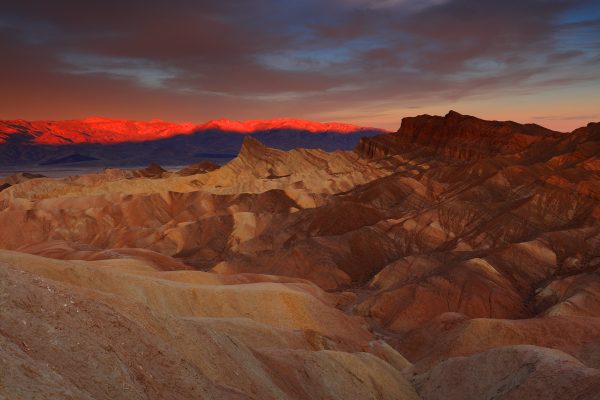
Singh-Ray 3-stop Galen Rowell Hard-Edge Graduated Neutral Density Filter. F/20 @ .4 sec, -2/3 stop exposure compensation. ISO 100, 30mm. Landscape preset, white balance 5800K.
In general, for landscape images, I use my “old school” film techniques of small apertures like F/18, 20 or 22. I usually set the ISO as low as possible, usually 100, creating the long exposures that I believe help bring in more color. I also typically darken my images with exposure compensation by -1/3 to 1 full stop. This adds more contrast and pop, in my opinion.
I encourage you to give my “All in Camera” technique a try and hope this blog was helpful in helping you do that. Happy Shooting!