When Don Smith switched from a 20-year career as sports photographer to dedicate himself to landscape photography, he adopted the philosophy that fine art images should do more than simply recreate reality. “The major theme in my workshops is the importance of seeing the finished image in my mind as I click the shutter. As Ansel Adams used to teach, we need to go on and visualize the finished image in our mind while we’re composing the scene in our camera.
This takes a thorough understanding of how light, lens, camera, and filters will render the scene as opposed to how your eye/brain actually sees the scene.
Of course post-processing plays a key role in how the finished image will look, but I teach students to get the image as ‘right’ as possible at the time it’s captured and to keep the processing to a minimum. I shot ‘chrome’ films for magazines for 20-plus years. There was very little wiggle room for exposure mistakes; thus, I learned how to be meticulous with my captures. We should treat digital captures the same way and that is what I like to impart to my students.
Of course, controlling the light is essential in creating any successful image, and Singh-Ray filters help me achieve that goal. There is a lot of talk these days that we no longer need filters, but there’s nothing further from the truth. Polarizers — for example — cannot be replicated in post-processing and I recommend having one on every lens you own. They do more than darken a blue sky. In fact, that is the last thing on my mind when using a polarizer. I want to first and foremost cut glare, be it from water or foliage, to increase color saturation.
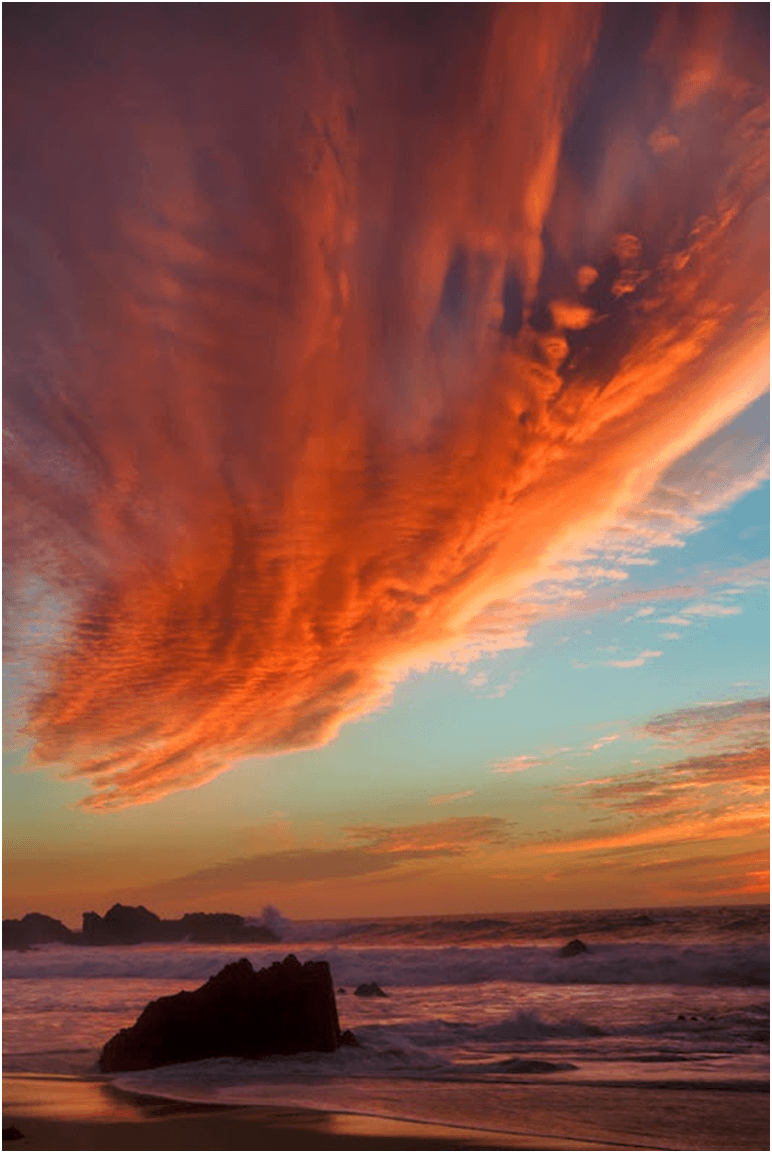
The first image (above) is a recent example of how light requires our continuous attention. While I was working with a client after the sun had set at Big Sur’s Garapatta State Beach, the sunset color had disappeared and I thought the shoot was finished. Then very unexpectedly, this beautiful cloud began to light and within a minute, it was on fire. It cast a warm reflection into the surf and I moved my client in front of these rocks to anchor the scene. I used my Singh-Ray LB Warming Polarizer to saturate the color and maximize the reflection as we were at a perfect 90-degree angle from the light source (the sun) even though it had set.
I also like to establish the light balance in each image as close to its ‘finished’ state as possible. This is where ND Grads come into play. I used a Singh-Ray 2-stop hard-step ND Grad to help balance the exposure in the foreground with that in the sky. It takes time to fully learn how to read light, but with consistent practice that goal can be achieved. In turn, that makes choosing the right filter more and more intuitive.

During my recent Kauai workshop in Hawaii, I took my students to the furthest northwestern portion of the Island for a sunset shoot just north of Ke’ e Beach. What first caught my attention was the beautiful turquoise color of the waves, as they would pound the incredible Na Pali Cliffs. I used a Singh-Ray LB Warming Polarizer to ensure that my Canon 5DMKIII camera was capturing the same colors my eye saw.
As the sun began to near set time, there was a small window of opportunity when the scene could be captured in one frame without the fear of blocked shadows or blown highlights. Of course this depends on the sensitivity of your camera’s sensor. It would have been nearly impossible to grad this scene correctly, so I stayed patient and waited for the contrast level in my scene to lessen. I kept a close eye on all three color-channel histograms on my LCD screen and when they all came into range, I went to work capturing my image.
I’m fortunate in that my workshop schedule takes me to locations that are on most peoples’ bucket list. In March, I traveled to Maui to help co-instruct a workshop with my friend Gary Hart. Pretty tough to turn down a week in Maui, and the fact that I hadn’t photographed there before was all it took.
Gary had split the workshop to take in as many areas of the Island as possible. The highlight for me was the Hana Coast. It was like someone had turned-back time. The road was enough to get anyone car sick with something like 1,000 turns, but the scenery makes it all worthwhile. Thank goodness for Dramamine!
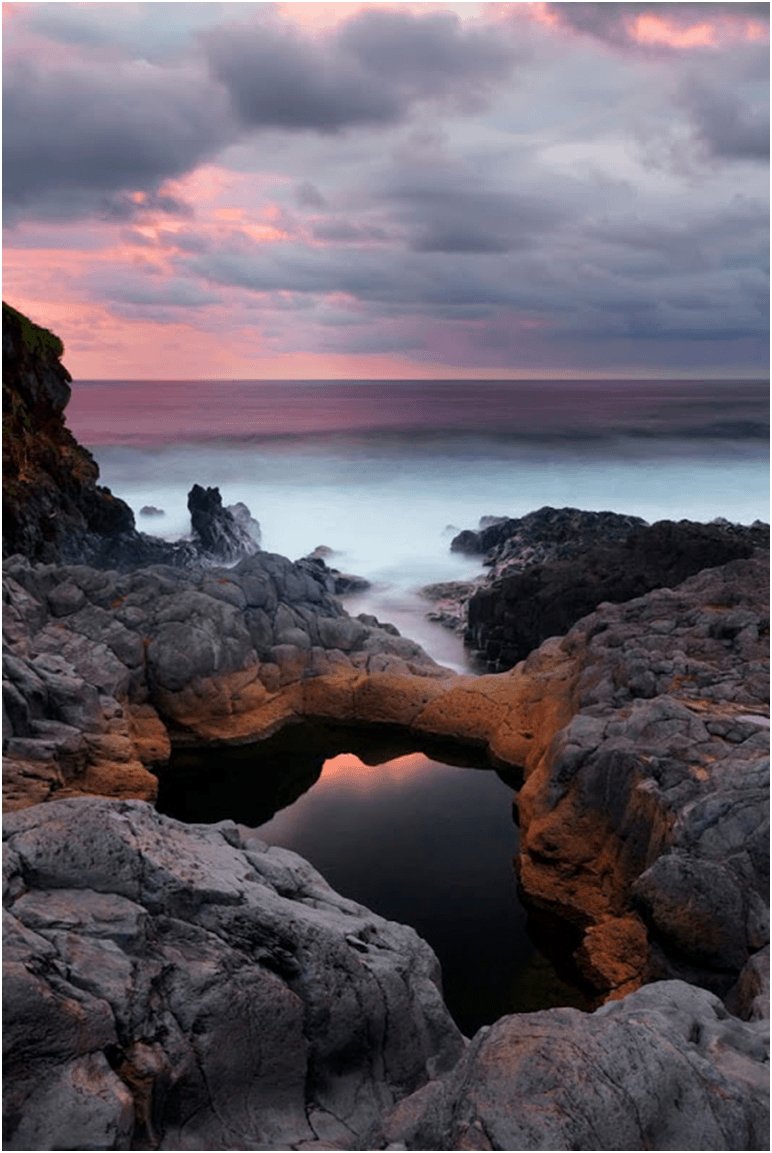
The group arrived in the afternoon and shot a sunset together. The next morning, they were up early and on-location at the famed Seven Sacred Pools. Gary had warned us that this location closes any time the Park rangers think the surf and/or water flow is too high. It is part of Haleakala National Park. Fortunately, it was open and our group had the location to ourselves. I could see the sky to the east of this pool was beginning to catch color, so I used my 24-70mm L Series II lens with my LB Warming Polarizer along with a 3-stop hard-step ND Grad to both control the pool’s reflection and balance the sky with the foreground rocks.
I like to handhold my grad filters and dodge them a bit to make sure I blend the transition line. The low light level allowed for a 15-second exposure and allowed for some movement in the clouds and water to soften the scene, which I felt perfectly matched to light and mood.
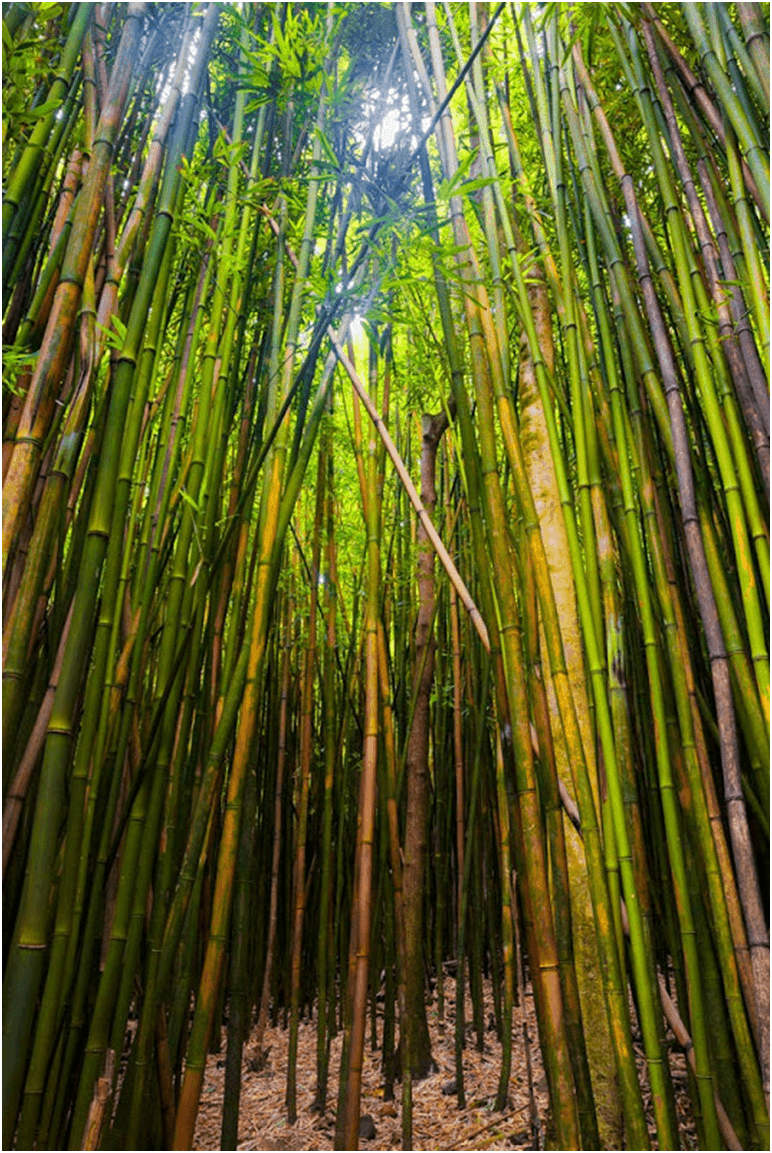
Once the sun rose and the light lost its warm color, the group hiked about a mile inland to a bamboo forest. This was almost surreal. The trail is cut amongst these towering bamboo that in most places was over 30 feet tall. I wanted to emphasize that sense of being dwarfed by these towering shoots, so I took a low angle and shot upwards.
My initial images still seemed a bit static, so I hit on the idea of moving the camera just at the end of my 8 second exposure to get a slight softening effect in the shot. To get this shutter speed required that I cut the amount of light hitting my sensor, so I used my Singh-Ray 5-stop Mor-Slo ND filter.
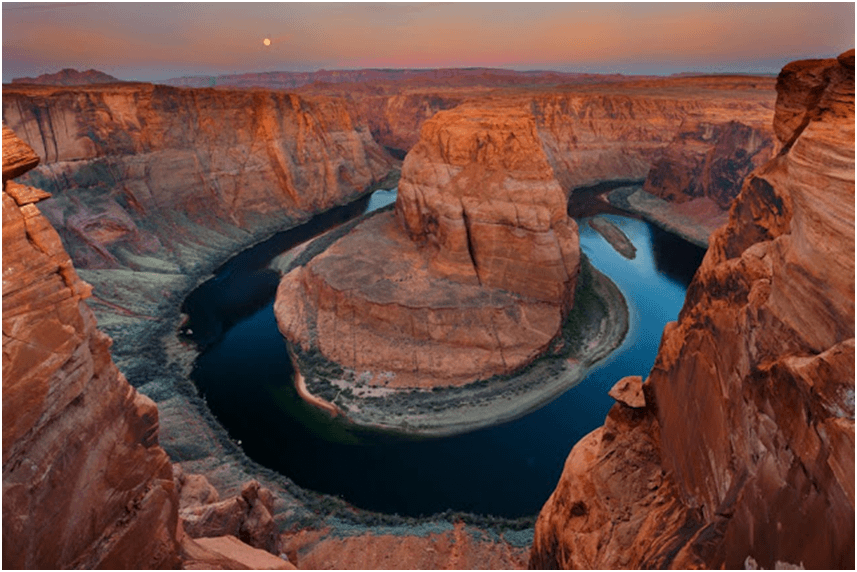
Once we had finished the workshop, Gary and I flew back home to California and rested for five days. Then we rented a car and drove to the Grand Canyon for the start of my Northern Arizona workshop. This is one of my most popular workshops. We shot for a couple days at the Canyon then moved to Page for our visits to Upper Antelope Canyon and Horseshoe Bend, and then finished the workshop in Sedona.
I like to time as many of my workshops to a full moon as possible. For my northern Arizona workshop, I had timed a sunrise shoot to coincide with a full moonset at the iconic Horseshoe Bend. I used my 16-35mm L lens and waited for the twilight wedge to appear. This scene had it all: full moon, a twilight wedge painting the sky and clouds with warm light, and of course, the iconic bend in the Colorado River that creates the horseshoe. For an image like this to succeed, I had to find the composition, anticipate the light, and remain patient. Once the pretty pinks arrived, all that was left to do was balance the sky and foreground. I used a Singh-Ray 2-stop hard-step ND Grad and the image was complete — it’s that simple! What we don’t want to do is run around unprepared then go into scramble mode once the light arrives — that is a recipe for disaster.
The optimum light comes and goes quickly. If I am ready, it is easy to capture multiple frames and various compositions. If I don’t arrive early and pre-scout the location, then chances are I am not going to come away with a successful image. I make sure my students are on location early. I want success for everyone and this is one way to guarantee it.”
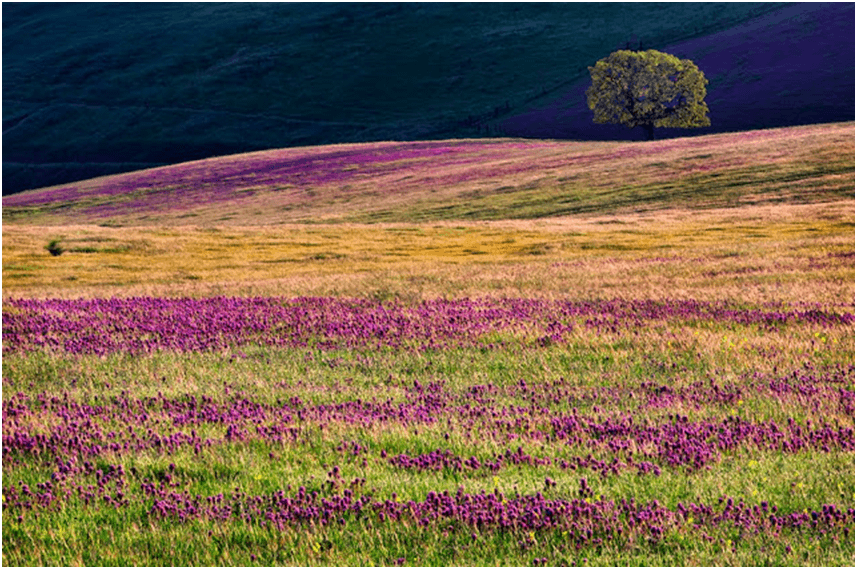
I love the fact that I live in a beautiful area of central California near the Monterey Bay. When I’m home, I am 30 minutes to the coast and 2-1/2 hours to Yosemite. Just east of my home, I am in the rolling hills of the Diablo Mountain Range in the southern Santa Clara Valley, just south of Silicon Valley. This spring, we got an incredible display of Owl’s Clover. I had never seen it this plentiful before.
My wife Beri and I took a drive one evening and came to this location, literally 12 minutes from our home. I used my 70-200mm L lens with a Singh-Ray ColorCombo Polarizer and waited for the setting sun to skim the landscape. The ColorCombo perfectly captured the warm hues in the grasses and clover. I composed the scene at 200mm to compress the clover and undulations of the landscape. Because there was a slight breeze that evening, I needed a bit faster shutter speed and decided to shoot this scene at f/8 and bracket my focus points. In post-processing, I blended to bracketed images to ensure sharpness from foreground to background. I love the rim light on the oak as it allows for separation off the shadowed hill in the background.
My Singh-Ray ColorCombo ensured that the warm colors my wife and I were seeing would be captured correctly. As you can see, it did a beautiful job!